How to create Photoshop language versions from a CSV
One design, several languages, too much copying and pasting. Give the words a reviewable table and let Photoshop place them into the template.
Use Photoshop’s Text Replacement variables to connect editable type layers to CSV columns. Import one row per language as a data set, preview the results, then export the data sets as separate PSDs. Prepare and approve the translations before importing them. Translation, template placement and final image export are separate steps.
An editor in this Photoshop discussion describes six listing images in five languages: thirty exports for each product. Another reader asks how to switch the strings in app screenshots between languages. Both are template-production questions. They need more than a translated sentence.
Here is a small working version of that handoff, tested in Photoshop 2026 on macOS.
Start with a template you can inspect
Download the PSD, CSV and output references. The archive includes a 1200 × 800 template, three language rows, three rendered reference images and reproduction instructions.
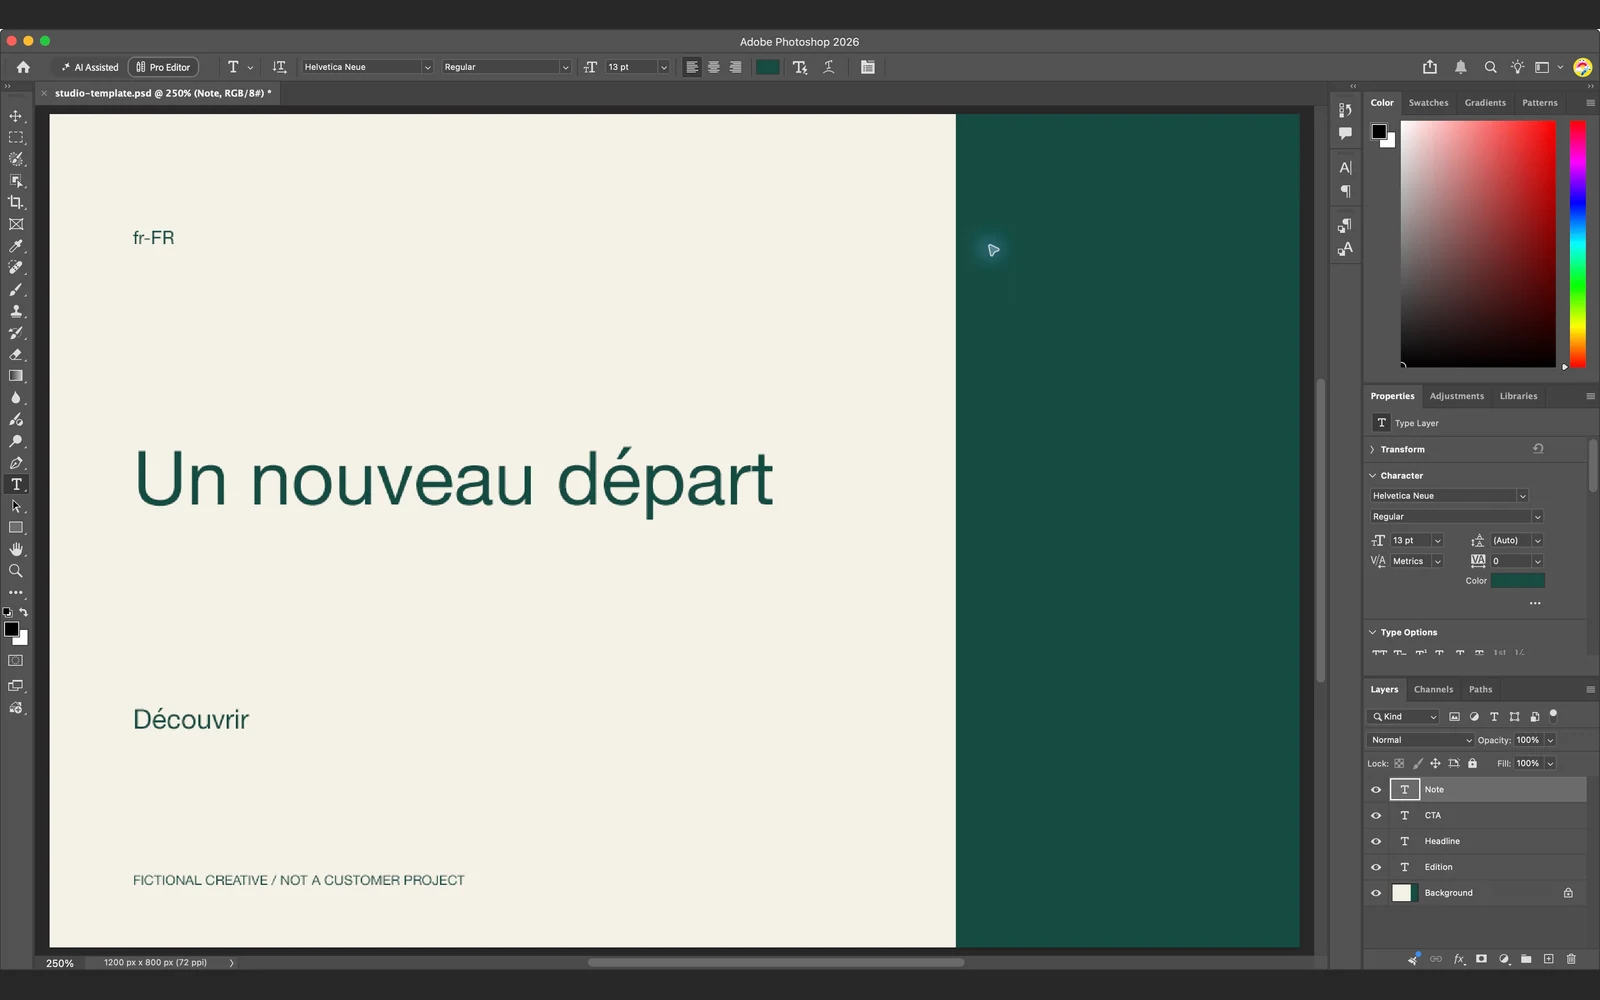
We bound the variables in native Photoshop, imported the CSV, previewed French and exported three separate PSDs. We reopened the German export in Photoshop and independently checked the literal text in all three output files against the CSV. The images below come from those exported PSDs’ saved composites.

en-GB.
fr-FR. The accents survived import and export.This is original fictional creative with manually authored illustrative copy. It is not a customer project, a paid Nativ translation run or qualified language approval. The template references Helvetica Neue; fonts are not bundled. Replace unavailable fonts and review the result on your machine.
For your own design, keep each changing phrase on an editable type layer. Words already baked into a photograph need a different image-translation workflow. This exercise does not test text inside Smart Objects, multiple artboards or vertical writing.
Prepare translations with context, then keep their identity
Keep a small review sheet with the source, target locale, layer identifier and approved wording. A headline and a button can share a campaign while needing different length constraints. Preserve those identities when moving copy into the CSV.
Nativ’s full MCP connection exposes translate_batch for related strings in one target language. These are example tool arguments, checked against the current schema, not a request we executed for the demonstration:
{
  "texts": ["A fresh start", "Explore"],
  "target_language": "French",
  "target_language_code": "fr",
  "source_language": "English",
  "source_language_code": "en",
  "context": "Fictional studio campaign. First item is a short headline; second is a button inviting the reader to explore. Keep the tone calm and concise."
}
Review each returned item against its source before assigning it to headline or cta. Repeat for another target language. Do not fill a failed or incomplete response with guessed copy.
For a phrase needing an explicit character constraint or inline glossary, the single-string translate tool has max_characters and glossary inputs. Those are not arguments on translate_batch. A character budget still cannot establish pixel fit: font, size and letter widths matter. Keep term decisions and language review with the wording you approve.
Nativ prepares the language in this handoff. Photoshop’s own Variables feature performs the CSV placement. This guide does not describe an automatic Nativ-to-Photoshop CSV exporter. If you prefer working directly on the canvas, see the Nativ Photoshop plugin workflow.
Make the CSV match the document
Our UTF-8 CSV contains three columns:
edition,headline,cta
en-GB,A fresh start,Explore
fr-FR,Un nouveau départ,Découvrir
de-DE,Ein neuer Anfang,Entdecken
Each heading has a real binding in the supplied PSD:
| Type layer | Text Replacement variable | What changes |
|---|---|---|
| Edition | edition | Visible locale label and data set name |
| Headline | headline | Main phrase |
| CTA | cta | Call to action |
The first column is also a defined variable. It is not an arbitrary notes column. In our first import attempt, edition had no layer binding and Photoshop reported too many variable names in the first line. Defining that third variable resolved the error without changing the CSV.
Keep comments, approval status and reviewer names in the review sheet rather than adding unmatched columns to this import file. Use a CSV-aware export when copy contains commas, quotes or line breaks. Adobe’s import reference documents delimiter and quoting rules. Our native test covered the simple three-row file above, including French accents; it was not an exhaustive CSV parser test.
Bind, import, preview and export
Work on a copy of the master. The supplied PSD already has these bindings and data sets, so you can inspect them before rebuilding the exercise:
- Open Image → Variables → Define. Select each changing type layer, enable Text Replacement and enter the corresponding variable name from the table. Leave the fixed footer alone.
- Choose File → Import → Variable Data Sets and select
languages.csv. We used Unicode (UTF-8) and Use First Column For Data Set Names. Replacing existing data sets is appropriate for this exercise’s copy; check before replacing a production document’s sets. - Open Image → Variables → Data Sets. Choose
fr-FR, enable Preview and inspect the headline and button together. Repeat for every row. A successful import is only a structural checkpoint. - Choose File → Export → Data Sets as Files. Select a new output folder, all intended data sets and a naming pattern containing the data set name.
- Open the resulting PSDs. Our export produced one editable PSD per language, not a folder of finished PNGs. Make any layout corrections, then use your normal delivery-image export settings.
Adobe’s data-driven graphics guide covers the host feature. Applying a data set changes the document’s displayed content, so keep the master and exported versions separate.
Approve the output, not just the spreadsheet
Variables replace values. They do not decide whether a translated headline belongs on two lines, whether the font supports a script or whether the visual hierarchy still works.
Check the longest phrases in the actual layout, missing glyphs, punctuation, button boundaries and the relationship between words and imagery. Arabic direction and shaping, or a deliberate vertical Japanese design, need a suitable font and document treatment; a locale code in the CSV is not a layout instruction.
Before uploading listing images, match each final filename to the intended locale and reopen the flattened delivery file. Confirm its dimensions and complete text, not just its presence in the output folder. Store the approved copy alongside the master so the next campaign revision starts from known wording. That is where a repeatable template earns its value: fewer manual placements, with an explicit place for language and design review.
Product references
How to fix translated text that overflows in Figma
Diagnose clipped translations in Figma: text resizing, parent auto layout, fonts and copy limits, with an interactive text-fit exercise.

How to translate a JPG or PNG without the original design file
Translate text baked into an image: choose the right workflow, review OCR and wording, render a new image, and check what changed before publishing.